


Batch Processing using GUI
All processing steps in DSI Studio can be applied to a large amount of subject data without the need to write the script and use the command-line interface. The GUI provides the necessary function to batch process subject data using the following steps:
Step B0: XNAT Download
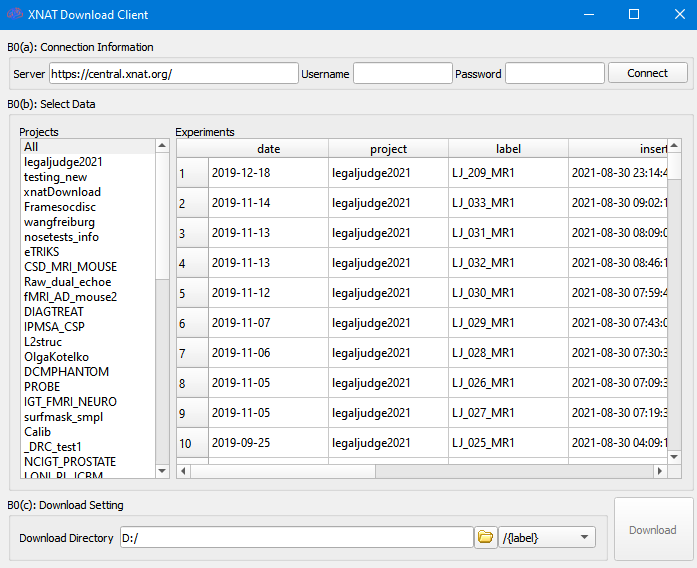
DSI Studio offers an interface to download data from XNAT at [Batch Processing][Step B0: XNAT Download]
Click the connect button to get a list of downloadable Projects. To use guest login, leave username and password blank.
Click on a project on the left will show its data on the right. To download the data, select the dataset on the right and click on the download button. The data will be saved to the download directory, and you can specify the sub-folders according to “label”, “project” etc.
Step B1a, B1b: Renaming DICOM
This function will rename and move files! Please make sure to backup original data before doing this step.
Use [Batch Processing][Step B1a: Rename DICOM files] or [Batch Processing][Step B1b: Rename DICOM in Subfolders] to rename and sort DICOM files. DSI Studio will create a folder for each scan and a subfolder for each sequence. You can place DICOM files of all subjects into one root folder and sort it all at once.
TIP: Try this function with only 2 or 3 subjects and see how the sorting work before applying it to all your data, which can be catastrophic!
Step B2a, B2b, B2c: Create SRC files
For NIFTI files, use [Batch Processing][Step B2a: NIFTI to SRC(BIDS)] or [Batch Processing][Step B2b: NIFTI to SRC(BIDS)] and select the study folder that contains all subjects’ data. For BIDS data, DSI Studio will ask for an output folder to save SRC files.
For DICOM files, click on [Batch Processing][Step B2c: DICOM to SRC/NIFTI] and select the root study folder that contains all subjects’ data. DSI Studio will generate an SRC within each subject’s folder. After generating all SRC file, you may search for all SRC files and placing them together in another folder for further processing.
After DSI Studio processes all data, I highly recommend doing [Diffusion MRI Analysis]Step T1a: Quality Control to exclude problematic data.
Step B3: Batch SRC Reconstruction
Click [Batch Processing][Step B3: SRC to FIB]. You may also use [Diffusion MRI Analysis][Step T2 Reconstruction] and select multiple SRC files.
For the connectometry analysis, please use [Step C1: Reconstruct SRC files for Connecometry] and follow the instructions at Create a connectometry database.
For Differential tractography for longitudinal data, you may use [Step T2 Reconstruction] and select all baseline SRC files. Then at [Step T2B(2)][Advanced Options][Compare SRC] select only the SRC file that matches the current loading SRC files (file name shown on the top window). For the rest SRC files, DSI Studio will find the best matching follow-up scans (make sure to put them in the same directory)(Versions after 1/12/2021).
Step B4: Automatic Fiber Tracking

Select [Batch Processing][B4: automatic fiber tracking] to bring up the automatic fiber tracking interface.
Step B4(a): Specify FIB Files
Click on the [Open] button to select FIB files for reconstruction and fiber tracking. You can also select FIB files (change file type when browsing files) to skip the reconstruction steps.
Step B4(b): Select Bundles
Select the bundle to be tracked. Some tracts are hard to map and would take a large amount of time. I would recommend choosing a few pathways at first and gradually adding more when needed.
Step B4(c): Parameters
| Parameters | Descriptions |
|---|---|
| GQI Length ratio | If SRC files are assigned in Step B4(a), GQI reconstruction will be done using the assigned length ratio. If FIB files are assigned, then this parameter is ignored. |
| Tract/Voxel Ratio | The number determines the number of streamlines be mapped. A higher value will lead to a much longer computation time, whereas a lower value will result in incomplete mapping. |
| Tolerance | Individuals may have track different a lot from the atlas. This distance value decides whether to consider a valid streamline. A higher value will allow for more complete mapping with the increasing risk of including false connections. |
| Pruning | Number of iteration to carry out “topology-informed pruning” (Yeh, 2019). Higher counts allow for removing more false connections, but they may also remove thin pathways if the streamline counts are not sufficient enough. |
| Output Statistics | Checked this to output track-related statistics including shape metrics and diffusion metrics. |
| Output Tractography files | Specify whether to output tractography |
| Output Tractography in ICBM152 Space | Specify whether to output tractography to the ICBM152 space |
| Default mask | Check this to use the default mask assigned by DSI Studio. If no check, when no mask is used (more computation time, but won’t lose brain regions). |
| Overwrite Previous Tract Output | Check this to overwrite any existing files (otherwise, DSI Studio will skip the analysis) |
Run Fiber Tracking
Click on the [Run] button to start processing. You may stop the process at any time and click again to continue (if [Overwrite Previous Track Output] is unchecked). DSI Studio will generate track files and statistics that can be inspected in [Step T3 Fiber Tracking]
Troubleshooting
Automatic fiber tracking may fail to generate tracks if the data are not correctly reconstructed, or if the data has a quality problem.
If “no result” happens very often (e.g. > 50%), then likely there is a post-processing problem such as (1) b-table flipped, (2) image volume flipped. The following video shows how to check the quality of your DWI data:
Possible solutions to quality issues are the following:
-
run quality control for SRC files and remove problematic dataset.
-
For b-table problems, uncheck the “check b-table” function at [Step T2 Reconstruction], and manually flip the b-table in y-direction if you use bval and bvec from FSL.
If “no result” happens only in very few subjects’ (< 5%) small pathways (e.g. right AF, SLF I, corticopontine tract…etc)(see examples reported in 1,2), then likely your data acquisition is not perfect enough to map those small tracts for all subjects.
The following is a list of common acquisition issues that may lead to poor fiber tracking results:
-
nonisotropic spatial resolution (e.g., slice thickness much larger than in-plane resolution)
-
b-value not enough (e.g., b-value less than 1,500)
-
insufficient diffusion sampling directions (e.g., less than 100 directions)
If you still have concerns or unexpected issues, please upload the problematic SRC file(s) using the upload link provided on the left navigation bar and notify me at the Discussion forum.
(Optional) Add New Tracts
The tracking list can be added by adding new atlas tracks. To do so, download HCP1065.1mm.fib.gz from brain.labsolver.org, and open it in Step T3 Fiber Tracking. Then use [Tract][Open Tracts] to load tractography atlas “icbm152.tt.gz” located in the \atlas\icbm152 folder (included in the DSI Studio Windows program. For Mac, right-click on dsi_studio.app and “show content” to find it inside the MacOS folder). You can track new pathways, add to the existing list, and save all pathways together as a new tractography atlas using [Tracts][Save Tracts][Save All Tracts As…].